Easy Teaching Operation for NEXTAGE Open by MoveIt! JoystickMoveIt! のジョイスティック機能で NEXTAGE Open を楽々ティーチング
ROS の動作計画アプリ MoveIt! を使った開発を行っている方々の中には,MoveIt! のバイナリ提供は更新が滞ってるから仕方なくソースコードをコンパイル (そしてコンパイルエラーと格闘) して時間を費やしてしまっている方もいるのではないでしょうか.ご安心下さい.最近メンテナンスチームが刷新されソフトウェアの更新が再び活発になってきており,今年に入って既にバイナリは3回更新されました.TORK もメンテナンスに積極的に貢献しています.
当協会のブログでも最近何度か MoveIt! の利用法についてご紹介してきました ([1],[2]).今回も新機能のご紹介です.今日紹介するのはジョイスティックから MoveIt! を制御する方法です.ロボットの動作生成・実行が,今までのように Rviz 上でマウスを使うことなく,ジョイスティックで可能になりました.
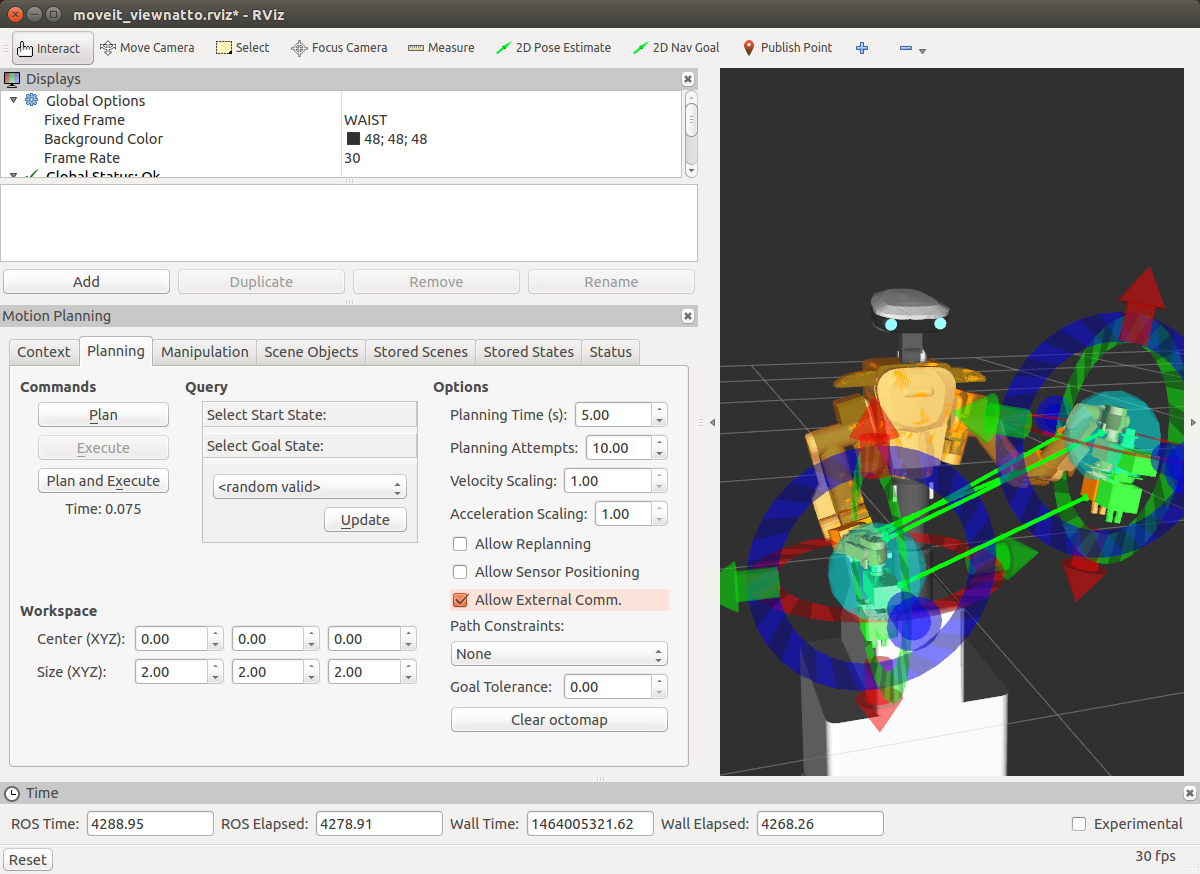
使い方は簡単.ジョイスティックが刺さったマシン上で,図のように Planning タブの AllowExternalExecution にチェックをして下さい.
あとは,以下の launch ファイルを立ちあげればジョイスティックでロボットを動かすことができます.ジョイスティックのコマンド等詳細な利用方法はこちらの WEB ページをご覧ください.
<!-- https://github.com/ros-planning/moveit_setup_assistant/pull/90 -->
<launch>
  <arg name="dev" default="/dev/input/js0" />

  <!-- Launch joy node -->
  <node pkg="joy" type="joy_node" name="joy">
    <param name="dev" value="$(arg dev)" /> <!-- Customize this to match the location your joystick is plugged in on-->
    <param name="deadzone" value="0.2" />
    <param name="autorepeat_rate" value="40" />
    <param name="coalesce_interval" value="0.025" />
  </node>

  <!-- Launch python interface -->
  <node pkg="moveit_ros_visualization" type="moveit_joy.py" output="screen" name="moveit_joy"/>
</launch>
また,NEXTAGE Open であれば,MoveIt! が起動している状態で次のコマンドひとつ起動すればジョイスティックが有効になります (jsX の値は変えて下さい).NEXTAGE Open 用の利用法をこちらにも記載しています.
One of good news about ROS community is that the maintenance of MoveIt! got revitalized where TORK is contributing to as well. In 2016 there has already been three binary update releases so far. No more building from source if you were forced to!
We’ve mentioned about MoveIt! a few times recently ([1],[2]), so do we today again. With the version 0.7.2 (on ROS Indigo), you can operate robot arms by joystick via MoveIt!
Running the feature is as simple as joystick. On RViz on the host where the joystick is plugged, check “Planning” tab –> “AllowExternalExecution” (see the image below).
Then run a launch file, either the one in your XXXX_moveit_config package if there’s already the aforementioned launch file, or simply make a launch file with the following:
<!-- https://github.com/ros-planning/moveit_setup_assistant/pull/90 -->
<launch>
  <arg name="dev" default="/dev/input/js0" />

  <!-- Launch joy node -->
  <node pkg="joy" type="joy_node" name="joy">
    <param name="dev" value="$(arg dev)" /> <!-- Customize this to match the location your joystick is plugged in on-->
    <param name="deadzone" value="0.2" />
    <param name="autorepeat_rate" value="40" />
    <param name="coalesce_interval" value="0.025" />
  </node>

  <!-- Launch python interface -->
  <node pkg="moveit_ros_visualization" type="moveit_joy.py" output="screen" name="moveit_joy"/>
</launch>
For the detail follow the usage page.
To run on NEXTAGE Open, make sure MoveIt! is running then run a single command below (modify jsX). You can also refer to wiki for joystick usage for NEXTAGE Open.
roslaunch nextage_moveit_config joystick_control.launch dev:=/dev/input/js1
(At the top window, the human operator plans the movement on RViz visualizer. Once the plan looks good then operator executes the plan so that the simulated robot in the bottom window conducts the movement. This is a screen capture so joystick isn’t invisible, but yes, all the robot’s movement is commanded from a Sony PS3 joystick.)
Isaac Saito subscriber
著者について