SwitchBot を ROS から利用する – コマンド操作編2
本シリーズ前回の記事 SwitchBot を ROS から利用する – コマンド操作編1 では SwitchBot を ROS から利用する switchbot_ros の導入とサンプル Python コードの実行の様子を紹介しました.
今回は前回の記事の続きとしてサンプルのソースコードで扱われていた SwitchBot デバイス以外のものを ROS から操作するために SwitchBot API のコマンドセットを調べて control_switchbot.py に実装する過程について紹介します.
- 利用可能な SwitchBot デバイス情報の取得
- SwitchBot デバイス API コマンドセットの調査
- SwitchBot デバイスコマンドのソースコード追記
利用可能な SwitchBot デバイス情報の取得
switchbot_ros のサンプル Python コード control_switchbot.py においてボット(スイッチ)をオンにする命令は次のようになっていて「デバイス名」とそれに対する「コマンド」の2つを指定する必要があります.
client.control_device('bot74a', 'turnOn')
client.control_device('デバイス名', 'コマンド')
このうち「コマンド」は SwitchBot API にてデバイスタイプごとに設定されているので「デバイスタイプ」が何かを知る必要があります.
ユーザのアカウントで登録されているデバイスの「デバイス名」と「デバイスタイプ」は switchbot.launch を実行すると表示されます.
(下記 launch オプションの YOUR_TOKEN と YOUR_SECRET をそれぞれユーザアカウントのトークンとシークレットに置き換えて実行)
switchbot.launch 実行入力
$ source ~/switchbot_ws/devel/setup.bash
$ roslaunch switchbot_ros switchbot.launch token:=YOUR_TOKEN secret:=YOUR_SECRET
switchbot.launch 実行出力例
... logging to /home/robotuser/.ros/log/87b6e5c8-c1a2-11ee-bce7-1d89a9d14e1f/roslaunch-robotuser-PC-62866.log
Checking log directory for disk usage. This may take a while.
Press Ctrl-C to interrupt
Done checking log file disk usage. Usage is <1GB.

started roslaunch server http://robotuser-PC:40731/

SUMMARY
========

PARAMETERS
 * /rosdistro: noetic
 * /rosversion: 1.16.0
 * /switchbot_ros/secret: (シークレットの上位数桁が表示)...
 * /switchbot_ros/token: (トークンの上位数桁が表示)...

NODES
  /
    switchbot_ros (switchbot_ros/switchbot_ros_server.py)

auto-starting new master
process[master]: started with pid [62874]
ROS_MASTER_URI=http://localhost:11311

setting /run_id to 87b6e5c8-c1a2-11ee-bce7-1d89a9d14e1f
process[rosout-1]: started with pid [62884]
started core service [/rosout]
process[switchbot_ros-2]: started with pid [62891]
[INFO] [1706861436.195243]: Switchbot API Client initialized.
[INFO] [1706861436.199678]: Using SwitchBot API v1.1
[INFO] [1706861436.204957]: Switchbot Device List:
6 Item(s)
deviceName: bot74a, deviceID: (固有のID番号が表示), deviceType: Bot
deviceName: hub2a, deviceID: (固有のID番号が表示), deviceType: Hub 2
deviceName: plugmini7a1, deviceID: (固有のID番号が表示), deviceType: Plug Mini (JP)
deviceName: remote-button10a, deviceID: (固有のID番号が表示), deviceType: Remote
deviceName: tapelight7a1, deviceID: (固有のID番号が表示), deviceType: Strip Light
deviceName: thermo-hygrometer-f7a, deviceID: (固有のID番号が表示), deviceType: Meter

[INFO] [1706861436.208853]: Switchbot Remote List:
2 Item(s)
deviceName: air-conditioner, deviceID: (固有のID番号が表示), remoteType: Air Conditioner
deviceName: pendant-light, deviceID: (固有のID番号が表示), remoteType: DIY Light

[INFO] [1706861436.214168]: Switchbot Scene List:
3 Item(s)
sceneName: turnoff-all-lights, sceneID: (固有のID番号が表示)
sceneName: turnon-all-lights, sceneID: (固有のID番号が表示)
sceneName: turnon-all-lights, sceneID: (固有のID番号が表示)

[INFO] [1706861436.254126]: Ready.
switchbot.launch 実行出力から次の1行を例にとると「デバイス名」が plugmini7a1 で「デバイスタイプ」が Plug Mini (JP) です.
deviceName: plugmini7a1, deviceID: (固有のID番号が表示), deviceType: Plug Mini (JP)
SwitchBot デバイス API コマンドセットの調査
操作したい SwitchBot デバイスタイプが分かればそのコマンドセットを調べます.SwitchBot API のコマンドセットは下記の Web ページで知ることができます.
今回はデバイスタイプ Plug Mini (JP) と Strip Light のデバイスを操作したいのでそれらのコマンドセットについて調べます.
Plug Mini (JP) のコマンドセット
電源プラグの On/Off を行う SwitchBot デバイスである Plug Mini (JP) のコマンドセットの説明は次のリンク先にあります.
上記 Web ページの Plug Mini (JP) コマンドセットの表をそのまま貼り付けたものが次の表です.
| deviceType | commandType | Command | command parameter | Description |
|---|---|---|---|---|
| Plug Mini (JP) | command | turnOn | default | set to ON state |
| Plug Mini (JP) | command | turnOff | default | set to OFF state |
| Plug Mini (JP) | command | toggle | default | toggle state |
デバイスの機能どおりに電源入 turnOn,電源切 turnOff,電源入切の切替 toggle の3つのコマンドにより構成されています.
Strip Light のコマンドセット
テープライト形状の SwitchBot デバイスである Strip Light のコマンドセットの説明は次のリンク先にあります.
上記 Web ページの Strip Light コマンドセットの表をそのまま貼り付けたものが次の表です.
| deviceType | commandType | Command | command parameter | Description |
|---|---|---|---|---|
| Strip Light | command | turnOn | default | set to ON state |
| Strip Light | command | turnOff | default | set to OFF state |
| Strip Light | command | toggle | default | toggle state |
| Strip Light | command | setBrightness | {1-100} |
set brightness |
| Strip Light | command | setColor | "{0-255}:{0-255}:{0-255}" |
set RGB color value |
点灯 turnOn,消灯 turnOff,明滅切替 toggle,輝度設定 setBrightness,色設定 setColor の5つのコマンドにより構成されていて,そのうち輝度設定では{1-100} の範囲で輝度設定, "{0-255}:{0-255}:{0-255}" の値で RGB 色設定を行います.
SwitchBot デバイスコマンドのソースコード追記
Plug Mini (JP) を操作するソースコード追記と実行
デバイス名 plugmini7a1 の Plug Mini (JP) を操作します. ROS からコマンドを送って On/Off の切り替え toggle をしてみます.
サンプルコード control_switchbot.py に client.control_device('plugmini7a1', 'toggle') を追加します.(下記ソースコードの 16行目)
control_switchbot.py
#!/usr/bin/env python

import rospy
from switchbot_ros.switchbot_ros_client import SwitchBotROSClient

rospy.init_node('controler_node')
client = SwitchBotROSClient()

devices = client.get_devices()
print(devices)

# client.control_device('pendant-light', 'turnOn')

# client.control_device('bot74a', 'turnOn')

client.control_device('plugmini7a1', 'toggle')
ここでは元々サンプルコードにあったペンダントライトとボット(スイッチ)の操作をする行(上記ソースコードの12,14行目)は行頭に # を入れてコメントアウトして実行されないようにしています.
変更を加えた control_switchbot.py ファイルを保存してから実行します.
ターミナル 1 : switchbot.launch 実行入力
$ source ~/switchbot_ws/devel/setup.bash
$ roslaunch switchbot_ros switchbot.launch token:=YOUR_TOKEN secret:=YOUR_SECRET
ターミナル 2 : control_switchbot.py 実行入力
$ source ~/switchbot_ws/devel/setup.bash
$ rosrun switchbot_ros control_switchbot.py
Strip Light を操作するソースコード追記と実行
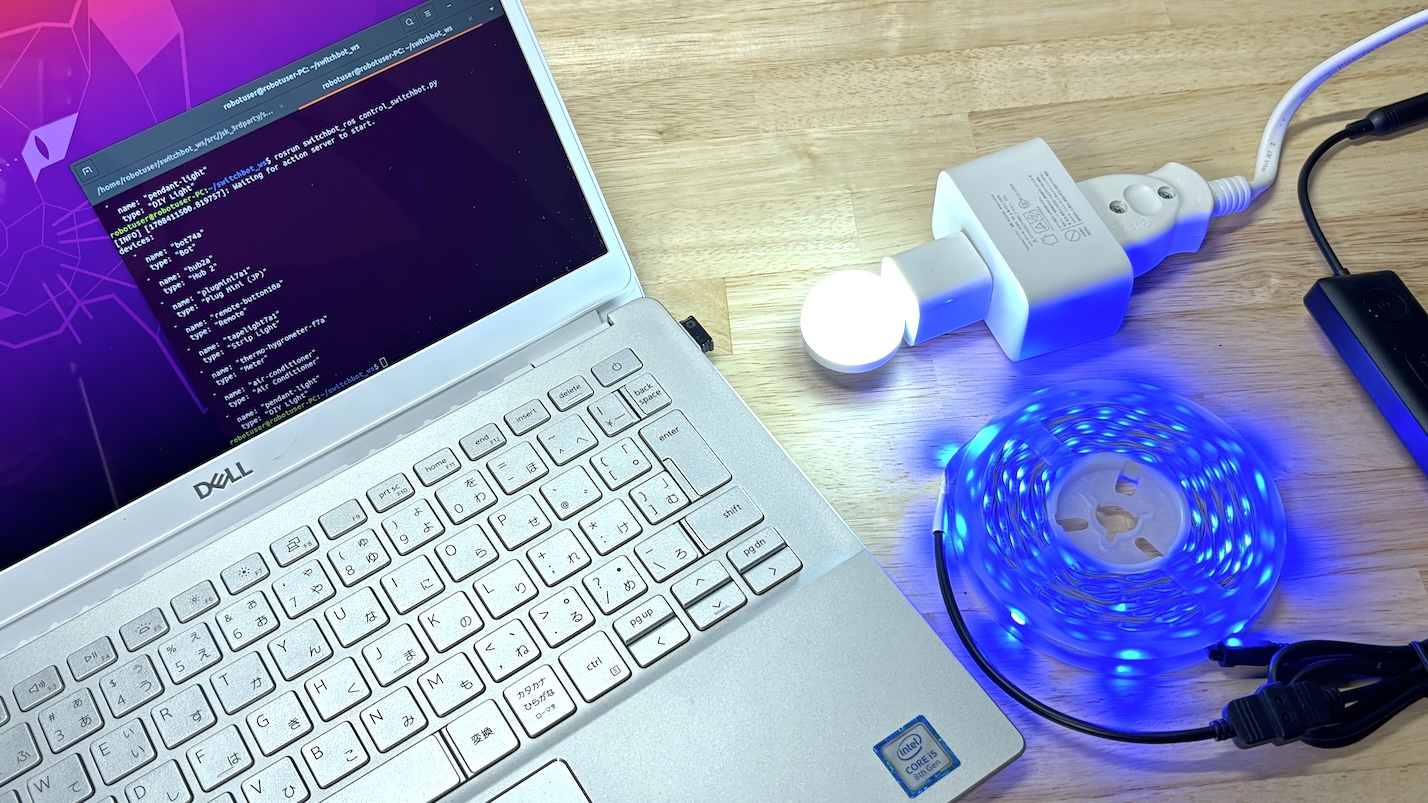
デバイス名 tapelight7a1 の Strip Light (テープライト)を操作します. ROS からコマンドを送って次の動作をしてみます.
- 消灯
- 点灯
- 輝度を 100% に設定
- 色を白
'255:255:255'に設定 - 色を赤
'255:0:0'に設定 - 色を緑
'0:255:0'に設定 - 色を青
'0:0:255'に設定 - 輝度を 1% に設定
- 消灯
サンプルコード control_switchbot.py に下記ソースコードの18行目以降を追加します.
値を設定する setBrightness や setColor といったコマンドでは各数値を control_device() の引数 parameter に文字列として渡します.
また control_device() の中ではコマンドを Action サーバにゴールとして送っているので新しいコマンドが前のコマンドに置き換わらないように1つ1つのコマンド実行を終えるのを待つように引数 wait に True を渡しています.
control_switchbot.py
#!/usr/bin/env python

import rospy
from switchbot_ros.switchbot_ros_client import SwitchBotROSClient

rospy.init_node('controler_node')
client = SwitchBotROSClient()

devices = client.get_devices()
print(devices)

# client.control_device('pendant-light', 'turnOn')

# client.control_device('bot74a', 'turnOn')

# client.control_device('plugmini7a1', 'toggle')

client.control_device('tapelight7a1', 'turnOff', wait=True)
client.control_device('tapelight7a1', 'turnOn', wait=True)
client.control_device('tapelight7a1', 'setBrightness', parameter='100', wait=True)
client.control_device('tapelight7a1', 'setColor', parameter='255:255:255', wait=True)
client.control_device('tapelight7a1', 'setColor', parameter='255:0:0', wait=True)
client.control_device('tapelight7a1', 'setColor', parameter='0:255:0', wait=True)
client.control_device('tapelight7a1', 'setColor', parameter='0:0:255', wait=True)
client.control_device('tapelight7a1', 'setBrightness', parameter='1', wait=True)
client.control_device('tapelight7a1', 'turnOff', wait=True)
前述の Plug Mini (JP) のときと同様に変更を加えた control_switchbot.py ファイルを保存してから実行します.
補足ソースコード変更
筆者が試した範囲では時々 client.control_device() が実行されない不具合が見受けられ,それが SwitchBotROSClient インスタンス作成時 client = SwitchBotROSClient() に Action サーバの起動やサーバへの接続が不十分であることが原因のように思われました.
そこで下記の switchbot_ros_client.py の21行目のように self.action_client.wait_for_server() を入れて Action サーバが起動して接続されるのを待つようにしたところ,現状では安定して client.control_device() が実行されているように感じます.
switchbot_ros_client.py
import rospy
import actionlib
from switchbot_ros.msg import SwitchBotCommandAction
from switchbot_ros.msg import SwitchBotCommandGoal
from switchbot_ros.msg import DeviceArray


class SwitchBotROSClient(object):

    def __init__(self,
                 actionname='switchbot_ros/switch',
                 topicname='switchbot_ros/devices'):

        self.actionname = actionname
        self.topicname = topicname
        self.action_client = actionlib.SimpleActionClient(
                actionname,
                SwitchBotCommandAction
                )
        rospy.loginfo("Waiting for action server to start.")
        self.action_client.wait_for_server()

    def get_devices(self, timeout=None):

        return rospy.wait_for_message(
                self.topicname,
                DeviceArray,
                timeout=timeout
                )

    def control_device(self,
                       device_name,
                       command,
                       parameter='',
                       command_type='',
                       wait=False
                       ):

        goal = SwitchBotCommandGoal()
        goal.device_name = device_name
        goal.command = command
        goal.parameter = parameter
        goal.command_type = command_type
        self.action_client.send_goal(goal)
        if wait:
            self.action_client.wait_for_result()
            return self.action_client.get_result()
今回の記事はここまでです.