
SwitchBot を ROS から利用する – データ取得編
本シリーズ前回の記事 SwitchBot を ROS から利用する – コマンド操作編2 では SwitchBot を ROS から利用する switchbot_ros のサンプルのソースコードで扱われていた SwitchBot デバイス以外のものを ROS から操作するために SwitchBot API のコマンドセットを調べて control_switchbot.py に実装する過程について紹介しました.
今回は SwitchBot デバイスのステータスデータの取得と ROS トピックへのパブリッシュを行ってみます.
switchbot_ros の更新・ビルド
前回の記事 SwitchBot を ROS から利用する – コマンド操作編2 を公開した後に GitHub 上の switchbot_ros が更新されて SwitchBot デバイスのステータスデータの取得とパブリッシュを行うソフトウェアソースコードが追加されました.
更新された switchbot_ros を実際に動作させる Ubuntu PC 内の switchbot_ros に適用してビルドします.
既に前回の記事の時点の switchbot_ros を含む jsk_3rdparty をクローンして利用している場合は次の手順で更新された GitHub 上の jsk_3rdparty を git でプル(ダウンロード更新)してビルドします.
switchbot_ros を含む jsk_3rdparty の更新とビルド
$ source ~/switchbot_ws/devel/setup.bash
$ cd ~/switchbot_ws/src/jsk_3rdparty
$ git checkout master
$ git pull origin master
$ catkin build
$ source ~/switchbot_ws/devel/setup.bash
利用可能な SwitchBot デバイス名の取得
ターミナル 1 : switchbot_ros の実行
前回記事と同じですがユーザの SwitchBot アカウントで登録されているデバイスの「デバイス名」と「デバイスタイプ」は switchbot.launch を実行すると表示されます.
(下記 launch オプションの YOUR_TOKEN と YOUR_SECRET をそれぞれユーザアカウントのトークンとシークレットに置き換えて実行)
switchbot.launch 実行入力
$ source ~/switchbot_ws/devel/setup.bash
$ roslaunch switchbot_ros switchbot.launch token:=YOUR_TOKEN secret:=YOUR_SECRET
switchbot.launch 実行出力例
... logging to /home/robotuser/.ros/log/87b6e5c8-c1a2-11ee-bce7-1d89a9d14e1f/roslaunch-robotuser-PC-62866.log
Checking log directory for disk usage. This may take a while.
Press Ctrl-C to interrupt
Done checking log file disk usage. Usage is <1GB.

started roslaunch server http://robotuser-PC:40731/

SUMMARY
========

PARAMETERS
 * /rosdistro: noetic
 * /rosversion: 1.16.0
 * /switchbot_ros/secret: (シークレットの上位数桁が表示)...
 * /switchbot_ros/token: (トークンの上位数桁が表示)...

NODES
  /
    switchbot_ros (switchbot_ros/switchbot_ros_server.py)

auto-starting new master
process[master]: started with pid [62874]
ROS_MASTER_URI=http://localhost:11311

setting /run_id to 87b6e5c8-c1a2-11ee-bce7-1d89a9d14e1f
process[rosout-1]: started with pid [62884]
started core service [/rosout]
process[switchbot_ros-2]: started with pid [62891]
[INFO] [1706861436.195243]: Switchbot API Client initialized.
[INFO] [1706861436.199678]: Using SwitchBot API v1.1
[INFO] [1706861436.204957]: Switchbot Device List:
6 Item(s)
deviceName: bot74a, deviceID: (固有のID番号が表示), deviceType: Bot
deviceName: hub2a, deviceID: (固有のID番号が表示), deviceType: Hub 2
deviceName: plugmini7a1, deviceID: (固有のID番号が表示), deviceType: Plug Mini (JP)
deviceName: remote-button10a, deviceID: (固有のID番号が表示), deviceType: Remote
deviceName: tapelight7a1, deviceID: (固有のID番号が表示), deviceType: Strip Light
deviceName: thermo-hygrometer-f7a, deviceID: (固有のID番号が表示), deviceType: Meter

[INFO] [1706861436.208853]: Switchbot Remote List:
2 Item(s)
deviceName: air-conditioner, deviceID: (固有のID番号が表示), remoteType: Air Conditioner
deviceName: pendant-light, deviceID: (固有のID番号が表示), remoteType: DIY Light

[INFO] [1706861436.214168]: Switchbot Scene List:
3 Item(s)
sceneName: turnoff-all-lights, sceneID: (固有のID番号が表示)
sceneName: turnon-all-lights, sceneID: (固有のID番号が表示)
sceneName: turnon-all-lights, sceneID: (固有のID番号が表示)

[INFO] [1706861436.254126]: Ready.
利用可能なデバイス名がコンソール出力されたので一旦 Ctrl-C にて switchbot.launch を終了します.
上記の switchbot.launch 実行出力例にある SwitchBot デバイスのうち取得するステータスがない Remote 以外の次のデバイスタイプは switchbot_ros にてステータスデータを取得することができます.
- Bot
- Hub 2
- Meter
- Plug Mini (JP)
- Strip Light
また上記リスト以外のデータ取得 API 提供がされている SwitchBot デバイスについては switchbot_ros のコードに組み込まれていませんが適宜情報をコードに加えれば switchbot_ros からもデータ取得できるようになると思います.
SwitchBot デバイスのステータスデータの取得と確認
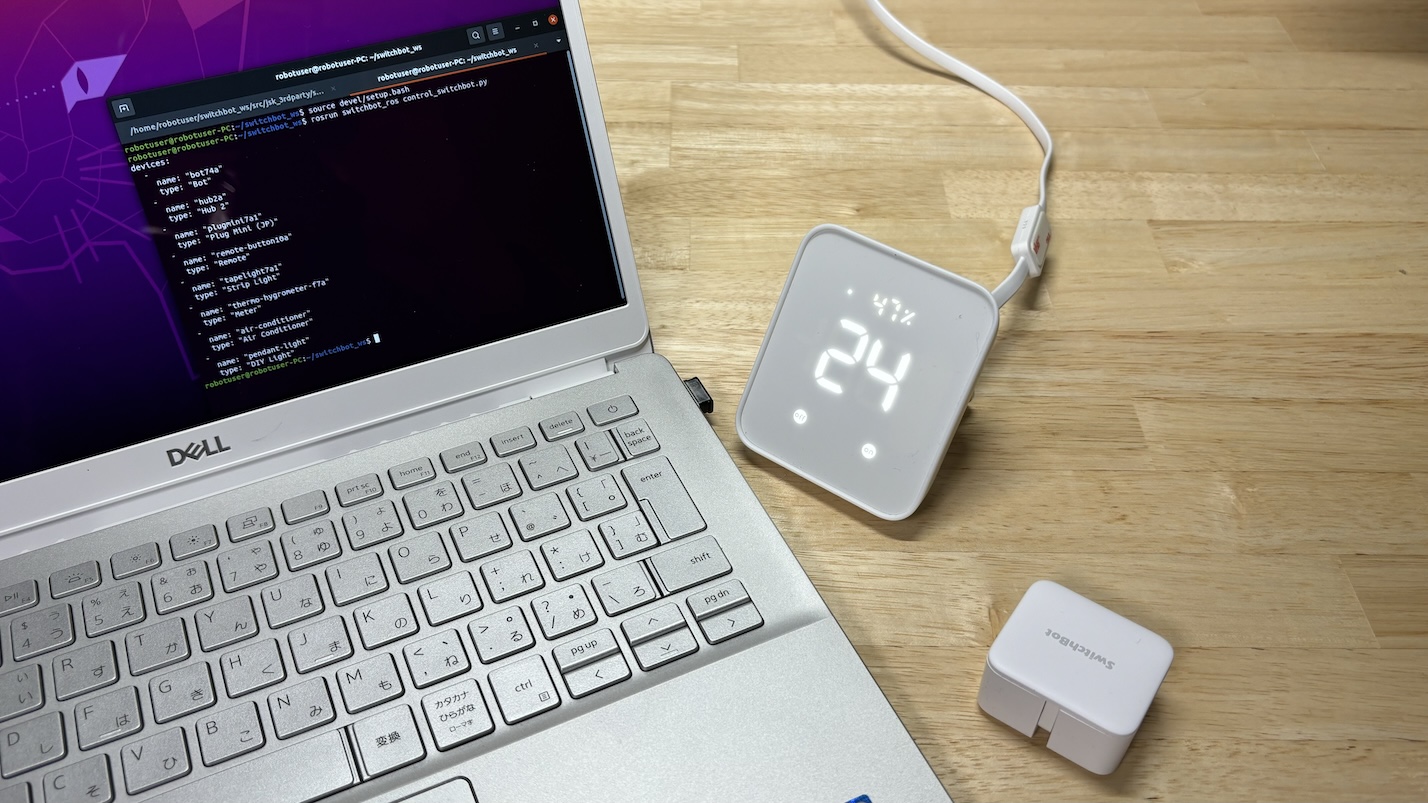
実行例として今回は SwitchBot の温湿度計(デバイスタイプ Meter)のステータスデータを取得してパブリッシュされている ROS トピックを表示してみます.先述の switchbot.launch の実行出力例から読み取ると,該当するデバイス名が thermo-hygrometer-f7a となっています.
ステータスデータを取得する場合は switchbot.launch 実行時に次の2つのオプションを追加します.
pub_status:=trueステータスを取得・パブリッシュを実行するオプション true/falsepub_device_name:=thermo-hygrometer-f7aデバイス名の指定(本例では thermo-hygrometer-f7a)
ターミナル 1 : switchbot_ros の実行
switchbot.launch 実行入力
$ source ~/switchbot_ws/devel/setup.bash
$ roslaunch switchbot_ros switchbot.launch token:=YOUR_TOKEN secret:=YOUR_SECRET pub_status:=true pub_device_name:=thermo-hygrometer-f7a
- 注1) 上記テキストボックスの横スクロールで全 launch オプションが表示されます.
- 注2) 各 launch オプションについて
YOUR_TOKENとYOUR_SECRETは各々の SwitchBot アカウントのトークンとシークレットに置き換えて実行してください.pub_status:=trueでステータスを取得・パブリッシュを実行します.pub_device_name:=thermo-hygrometer-f7aのthermo-hygrometer-f7aは各ユーザ利用のデバイス名に変更してください.
switchbot.launch 実行出力例
... logging to /home/robotuser/.ros/log/81bc64b6-faf2-11ee-8dad-e57ee950b51d/roslaunch-robotuser-PC-28197.log
Checking log directory for disk usage. This may take a while.
Press Ctrl-C to interrupt
Done checking log file disk usage. Usage is <1GB.

started roslaunch server http://robotuser-PC:35371/

SUMMARY
========

PARAMETERS
 * /rosdistro: noetic
 * /rosversion: 1.16.0
 * /switchbot_ros/secret: (シークレットの上位数桁が表示)...
 * /switchbot_ros/token: (トークンの上位数桁が表示)...
 * /switchbot_status_publisher/device_name: thermo-hygrometer...
 * /switchbot_status_publisher/rate: 0.1
 * /switchbot_status_publisher/secret: (シークレットの上位数桁が表示)...
 * /switchbot_status_publisher/token: (トークンの上位数桁が表示)...

NODES
  /
    switchbot_ros (switchbot_ros/switchbot_ros_server.py)
    switchbot_status_publisher (switchbot_ros/switchbot_status_publisher.py)

auto-starting new master
process[master]: started with pid [28205]
ROS_MASTER_URI=http://localhost:11311

setting /run_id to 81bc64b6-faf2-11ee-8dad-e57ee950b51d
process[rosout-1]: started with pid [28215]
started core service [/rosout]
process[switchbot_ros-2]: started with pid [28222]
process[switchbot_status_publisher-3]: started with pid [28223]
[INFO] [1713163000.937913]: Switchbot API Client initialized.
[INFO] [1713163000.938005]: Switchbot API Client initialized.
[INFO] [1713163000.940084]: Using SwitchBot API v1.1
[INFO] [1713163000.940382]: Using SwitchBot API v1.1
[INFO] [1713163000.942545]: Switchbot Device List:
6 Item(s)
deviceName: bot74a, deviceID: (固有のID番号が表示), deviceType: Bot
deviceName: hub2a, deviceID: (固有のID番号が表示), deviceType: Hub 2
deviceName: plugmini7a1, deviceID: (固有のID番号が表示), deviceType: Plug Mini (JP)
deviceName: remote-button10a, deviceID: (固有のID番号が表示), deviceType: Remote
deviceName: tapelight7a1, deviceID: (固有のID番号が表示), deviceType: Strip Light
deviceName: thermo-hygrometer-f7a, deviceID: (固有のID番号が表示), deviceType: Meter

[INFO] [1713163000.944131]: Switchbot Remote List:
2 Item(s)
deviceName: air-conditioner, deviceID: (固有のID番号が表示), remoteType: Air Conditioner
deviceName: pendant-light, deviceID: (固有のID番号が表示), remoteType: DIY Light

[INFO] [1713163000.944268]: Rate: 0.1
[INFO] [1713163000.945732]: Switchbot Scene List:
2 Item(s)
sceneName: turnoff-all-lights, sceneID: (固有のID番号が表示)
sceneName: turnon-all-lights, sceneID: (固有のID番号が表示)

[INFO] [1713163000.947428]: deviceName: thermo-hygrometer-f7a / deviceType: Meter
[INFO] [1713163000.951801]: Ready: SwitchBot Status Publisher for thermo-hygrometer-f7a
[INFO] [1713163000.966800]: Ready.
ターミナル 2 : ROS トピックの確認
rostopic list の実行入力
$ source ~/switchbot_ws/devel/setup.bash
$ rostopic list
rostopic list の実行出力例
/rosout
/rosout_agg
/switchbot_ros/devices
/switchbot_ros/switch/cancel
/switchbot_ros/switch/feedback
/switchbot_ros/switch/goal
/switchbot_ros/switch/result
/switchbot_ros/switch/status
/switchbot_status_publisher/thermo_hygrometer_f7a
rostopic echo 実行入力
$ rostopic echo /switchbot_status_publisher/thermo_hygrometer_f7a
rostopic echo の実行出力例
header:
  seq: 1
  stamp:
    secs: 1713163093
    nsecs: 412018775
  frame_id: ''
temperature: 26.9
humidity: 36.0
battery: 100.0
---
header:
  seq: 2
  stamp:
    secs: 1713163103
    nsecs: 447003364
  frame_id: ''
temperature: 26.9
humidity: 36.0
battery: 100.0
---
header:
  seq: 3
  stamp:
    secs: 1713163113
    nsecs: 380291700
  frame_id: ''
temperature: 26.9
humidity: 36.0
battery: 100.0
SwitchBot 温湿度計 Meter のステータスデータとして温度・湿度などが取得されて ROS トピックにパブリッシュされている様子がわかるかと思います.
ステータスの取得とパブリッシュの間隔は switchbot.launch のデフォルト設定で 0.1 [Hz] = 10秒間隔 になっています.これを変更する場合には switchbot.launch のオプションで pub_status_rate:=0.05 のように追加します.温湿度のように急に変化しなさそうなデータの場合はもっと長めの間隔でも良いかもしれません.
今回の記事はここまでです.
SwitchBot を ROS から利用する – コマンド操作編2
本シリーズ前回の記事 SwitchBot を ROS から利用する – コマンド操作編1 では SwitchBot を ROS から利用する switchbot_ros の導入とサンプル Python コードの実行の様子を紹介しました.
今回は前回の記事の続きとしてサンプルのソースコードで扱われていた SwitchBot デバイス以外のものを ROS から操作するために SwitchBot API のコマンドセットを調べて control_switchbot.py に実装する過程について紹介します.
- 利用可能な SwitchBot デバイス情報の取得
- SwitchBot デバイス API コマンドセットの調査
- SwitchBot デバイスコマンドのソースコード追記
利用可能な SwitchBot デバイス情報の取得
switchbot_ros のサンプル Python コード control_switchbot.py においてボット(スイッチ)をオンにする命令は次のようになっていて「デバイス名」とそれに対する「コマンド」の2つを指定する必要があります.
client.control_device('bot74a', 'turnOn')
client.control_device('デバイス名', 'コマンド')
このうち「コマンド」は SwitchBot API にてデバイスタイプごとに設定されているので「デバイスタイプ」が何かを知る必要があります.
ユーザのアカウントで登録されているデバイスの「デバイス名」と「デバイスタイプ」は switchbot.launch を実行すると表示されます.
(下記 launch オプションの YOUR_TOKEN と YOUR_SECRET をそれぞれユーザアカウントのトークンとシークレットに置き換えて実行)
switchbot.launch 実行入力
$ source ~/switchbot_ws/devel/setup.bash
$ roslaunch switchbot_ros switchbot.launch token:=YOUR_TOKEN secret:=YOUR_SECRET
switchbot.launch 実行出力例
... logging to /home/robotuser/.ros/log/87b6e5c8-c1a2-11ee-bce7-1d89a9d14e1f/roslaunch-robotuser-PC-62866.log
Checking log directory for disk usage. This may take a while.
Press Ctrl-C to interrupt
Done checking log file disk usage. Usage is <1GB.

started roslaunch server http://robotuser-PC:40731/

SUMMARY
========

PARAMETERS
 * /rosdistro: noetic
 * /rosversion: 1.16.0
 * /switchbot_ros/secret: (シークレットの上位数桁が表示)...
 * /switchbot_ros/token: (トークンの上位数桁が表示)...

NODES
  /
    switchbot_ros (switchbot_ros/switchbot_ros_server.py)

auto-starting new master
process[master]: started with pid [62874]
ROS_MASTER_URI=http://localhost:11311

setting /run_id to 87b6e5c8-c1a2-11ee-bce7-1d89a9d14e1f
process[rosout-1]: started with pid [62884]
started core service [/rosout]
process[switchbot_ros-2]: started with pid [62891]
[INFO] [1706861436.195243]: Switchbot API Client initialized.
[INFO] [1706861436.199678]: Using SwitchBot API v1.1
[INFO] [1706861436.204957]: Switchbot Device List:
6 Item(s)
deviceName: bot74a, deviceID: (固有のID番号が表示), deviceType: Bot
deviceName: hub2a, deviceID: (固有のID番号が表示), deviceType: Hub 2
deviceName: plugmini7a1, deviceID: (固有のID番号が表示), deviceType: Plug Mini (JP)
deviceName: remote-button10a, deviceID: (固有のID番号が表示), deviceType: Remote
deviceName: tapelight7a1, deviceID: (固有のID番号が表示), deviceType: Strip Light
deviceName: thermo-hygrometer-f7a, deviceID: (固有のID番号が表示), deviceType: Meter

[INFO] [1706861436.208853]: Switchbot Remote List:
2 Item(s)
deviceName: air-conditioner, deviceID: (固有のID番号が表示), remoteType: Air Conditioner
deviceName: pendant-light, deviceID: (固有のID番号が表示), remoteType: DIY Light

[INFO] [1706861436.214168]: Switchbot Scene List:
3 Item(s)
sceneName: turnoff-all-lights, sceneID: (固有のID番号が表示)
sceneName: turnon-all-lights, sceneID: (固有のID番号が表示)
sceneName: turnon-all-lights, sceneID: (固有のID番号が表示)

[INFO] [1706861436.254126]: Ready.
switchbot.launch 実行出力から次の1行を例にとると「デバイス名」が plugmini7a1 で「デバイスタイプ」が Plug Mini (JP) です.
deviceName: plugmini7a1, deviceID: (固有のID番号が表示), deviceType: Plug Mini (JP)
SwitchBot デバイス API コマンドセットの調査
操作したい SwitchBot デバイスタイプが分かればそのコマンドセットを調べます.SwitchBot API のコマンドセットは下記の Web ページで知ることができます.
今回はデバイスタイプ Plug Mini (JP) と Strip Light のデバイスを操作したいのでそれらのコマンドセットについて調べます.
Plug Mini (JP) のコマンドセット
電源プラグの On/Off を行う SwitchBot デバイスである Plug Mini (JP) のコマンドセットの説明は次のリンク先にあります.
上記 Web ページの Plug Mini (JP) コマンドセットの表をそのまま貼り付けたものが次の表です.
| deviceType | commandType | Command | command parameter | Description |
|---|---|---|---|---|
| Plug Mini (JP) | command | turnOn | default | set to ON state |
| Plug Mini (JP) | command | turnOff | default | set to OFF state |
| Plug Mini (JP) | command | toggle | default | toggle state |
デバイスの機能どおりに電源入 turnOn,電源切 turnOff,電源入切の切替 toggle の3つのコマンドにより構成されています.
Strip Light のコマンドセット
テープライト形状の SwitchBot デバイスである Strip Light のコマンドセットの説明は次のリンク先にあります.
上記 Web ページの Strip Light コマンドセットの表をそのまま貼り付けたものが次の表です.
| deviceType | commandType | Command | command parameter | Description |
|---|---|---|---|---|
| Strip Light | command | turnOn | default | set to ON state |
| Strip Light | command | turnOff | default | set to OFF state |
| Strip Light | command | toggle | default | toggle state |
| Strip Light | command | setBrightness | {1-100} |
set brightness |
| Strip Light | command | setColor | "{0-255}:{0-255}:{0-255}" |
set RGB color value |
点灯 turnOn,消灯 turnOff,明滅切替 toggle,輝度設定 setBrightness,色設定 setColor の5つのコマンドにより構成されていて,そのうち輝度設定では{1-100} の範囲で輝度設定, "{0-255}:{0-255}:{0-255}" の値で RGB 色設定を行います.
SwitchBot デバイスコマンドのソースコード追記
Plug Mini (JP) を操作するソースコード追記と実行
デバイス名 plugmini7a1 の Plug Mini (JP) を操作します. ROS からコマンドを送って On/Off の切り替え toggle をしてみます.
サンプルコード control_switchbot.py に client.control_device('plugmini7a1', 'toggle') を追加します.(下記ソースコードの 16行目)
control_switchbot.py
#!/usr/bin/env python

import rospy
from switchbot_ros.switchbot_ros_client import SwitchBotROSClient

rospy.init_node('controler_node')
client = SwitchBotROSClient()

devices = client.get_devices()
print(devices)

# client.control_device('pendant-light', 'turnOn')

# client.control_device('bot74a', 'turnOn')

client.control_device('plugmini7a1', 'toggle')
ここでは元々サンプルコードにあったペンダントライトとボット(スイッチ)の操作をする行(上記ソースコードの12,14行目)は行頭に # を入れてコメントアウトして実行されないようにしています.
変更を加えた control_switchbot.py ファイルを保存してから実行します.
ターミナル 1 : switchbot.launch 実行入力
$ source ~/switchbot_ws/devel/setup.bash
$ roslaunch switchbot_ros switchbot.launch token:=YOUR_TOKEN secret:=YOUR_SECRET
ターミナル 2 : control_switchbot.py 実行入力
$ source ~/switchbot_ws/devel/setup.bash
$ rosrun switchbot_ros control_switchbot.py
Strip Light を操作するソースコード追記と実行
デバイス名 tapelight7a1 の Strip Light (テープライト)を操作します. ROS からコマンドを送って次の動作をしてみます.
- 消灯
- 点灯
- 輝度を 100% に設定
- 色を白
'255:255:255'に設定 - 色を赤
'255:0:0'に設定 - 色を緑
'0:255:0'に設定 - 色を青
'0:0:255'に設定 - 輝度を 1% に設定
- 消灯
サンプルコード control_switchbot.py に下記ソースコードの18行目以降を追加します.
値を設定する setBrightness や setColor といったコマンドでは各数値を control_device() の引数 parameter に文字列として渡します.
また control_device() の中ではコマンドを Action サーバにゴールとして送っているので新しいコマンドが前のコマンドに置き換わらないように1つ1つのコマンド実行を終えるのを待つように引数 wait に True を渡しています.
control_switchbot.py
#!/usr/bin/env python

import rospy
from switchbot_ros.switchbot_ros_client import SwitchBotROSClient

rospy.init_node('controler_node')
client = SwitchBotROSClient()

devices = client.get_devices()
print(devices)

# client.control_device('pendant-light', 'turnOn')

# client.control_device('bot74a', 'turnOn')

# client.control_device('plugmini7a1', 'toggle')

client.control_device('tapelight7a1', 'turnOff', wait=True)
client.control_device('tapelight7a1', 'turnOn', wait=True)
client.control_device('tapelight7a1', 'setBrightness', parameter='100', wait=True)
client.control_device('tapelight7a1', 'setColor', parameter='255:255:255', wait=True)
client.control_device('tapelight7a1', 'setColor', parameter='255:0:0', wait=True)
client.control_device('tapelight7a1', 'setColor', parameter='0:255:0', wait=True)
client.control_device('tapelight7a1', 'setColor', parameter='0:0:255', wait=True)
client.control_device('tapelight7a1', 'setBrightness', parameter='1', wait=True)
client.control_device('tapelight7a1', 'turnOff', wait=True)
前述の Plug Mini (JP) のときと同様に変更を加えた control_switchbot.py ファイルを保存してから実行します.
補足ソースコード変更
筆者が試した範囲では時々 client.control_device() が実行されない不具合が見受けられ,それが SwitchBotROSClient インスタンス作成時 client = SwitchBotROSClient() に Action サーバの起動やサーバへの接続が不十分であることが原因のように思われました.
そこで下記の switchbot_ros_client.py の21行目のように self.action_client.wait_for_server() を入れて Action サーバが起動して接続されるのを待つようにしたところ,現状では安定して client.control_device() が実行されているように感じます.
switchbot_ros_client.py
import rospy
import actionlib
from switchbot_ros.msg import SwitchBotCommandAction
from switchbot_ros.msg import SwitchBotCommandGoal
from switchbot_ros.msg import DeviceArray


class SwitchBotROSClient(object):

    def __init__(self,
                 actionname='switchbot_ros/switch',
                 topicname='switchbot_ros/devices'):

        self.actionname = actionname
        self.topicname = topicname
        self.action_client = actionlib.SimpleActionClient(
                actionname,
                SwitchBotCommandAction
                )
        rospy.loginfo("Waiting for action server to start.")
        self.action_client.wait_for_server()

    def get_devices(self, timeout=None):

        return rospy.wait_for_message(
                self.topicname,
                DeviceArray,
                timeout=timeout
                )

    def control_device(self,
                       device_name,
                       command,
                       parameter='',
                       command_type='',
                       wait=False
                       ):

        goal = SwitchBotCommandGoal()
        goal.device_name = device_name
        goal.command = command
        goal.parameter = parameter
        goal.command_type = command_type
        self.action_client.send_goal(goal)
        if wait:
            self.action_client.wait_for_result()
            return self.action_client.get_result()
今回の記事はここまでです.
SwitchBot を ROS から利用する – コマンド操作編1
本記事では SwitchBot を ROS から利用できるソフトウェア switchbot_ros の使い方を紹介します.
SwitchBot は多くの IoT スマートホームデバイス製品を提供しているブランドで,既にそれらを日常生活の中で活用されている方も多いのではないでしょうか.
SwitchBot からはソフトウェアインターフェースとして WebAPI が提供されていて,2024年2月はじめの時点での最新バージョンが v1.1 となっています.
SwitchBot の WebAPI を ROS から利用する switchbot_ros は下記のリポジトリで公開されていて SwitchBot API v1.1 にも対応しています.
SwitchBot の機器を ROS のシステムに組み込むことによりロボットとスマートホームデバイスを組み合わせた動作システムを簡単に実現することが可能となります.
今回は switchbot_ros を含む jsk_3rdparty リポジトリを Ubuntu PC 内の ROS ワークスペースにクローン・ビルドして ROS から SwitchBot デバイスを動作させます.
switchbot_ros のビルド
本記事では次の環境で switchbot_ros を利用しています.
- Ubuntu 20.04
- ROS Noetic
Ubuntu や ROS のインストールが済んだ状態で次のように switchbot_ros を利用するためのワークスペースを作成して jsk_3rdparty リポジトリをクローンしてビルドします.
$ source /opt/ros/noetic/setup.bash
$ mkdir -p ~/switchbot_ws/src
$ cd ~/switchbot_ws
$ catkin build
$ source ~/switchbot_ws/devel/setup.bash
$ cd ~/switchbot_ws/src
$ git clone https://github.com/jsk-ros-pkg/jsk_3rdparty.git
$ cd ~/switchbot_ws
$ rosdep install -y -r --from-paths src --ignore-src
$ catkin build
$ source ~/switchbot_ws/devel/setup.bash
SwitchBot API のトークンとシークレットの取得
switchbot_ros は SwitchBot API を利用していますので SwitchBot API にアクセスするための SwitchBot アカウント各々に固有の「トークン(token)」と「シークレット(secret)」の2つの情報が必要になります.
SwitchBot Magazine – 【API】新バージョンAPI v1.1を公開しました にトークンとシークレットの取得方法などが書かれています.この記事から引用・まとめをするとトークンとシークレットの取得方法はつぎのようになっています.
- App Store または Google Play Store より SwitchBot アプリをダウンロード
- SwitchBot アカウントを作成またはサインイン
- オープントークンを生成
- 「プロフィールページ」 → 「設定」へ移動
- 「アプリバージョン」を10回タップ → 「開発者向けオプション」が表示される
- 「開発者向けオプション」をタップ
- 「トークン」と「クライアントシークレット」をコピーしてテキストとして保存
switchbot_ros の実行
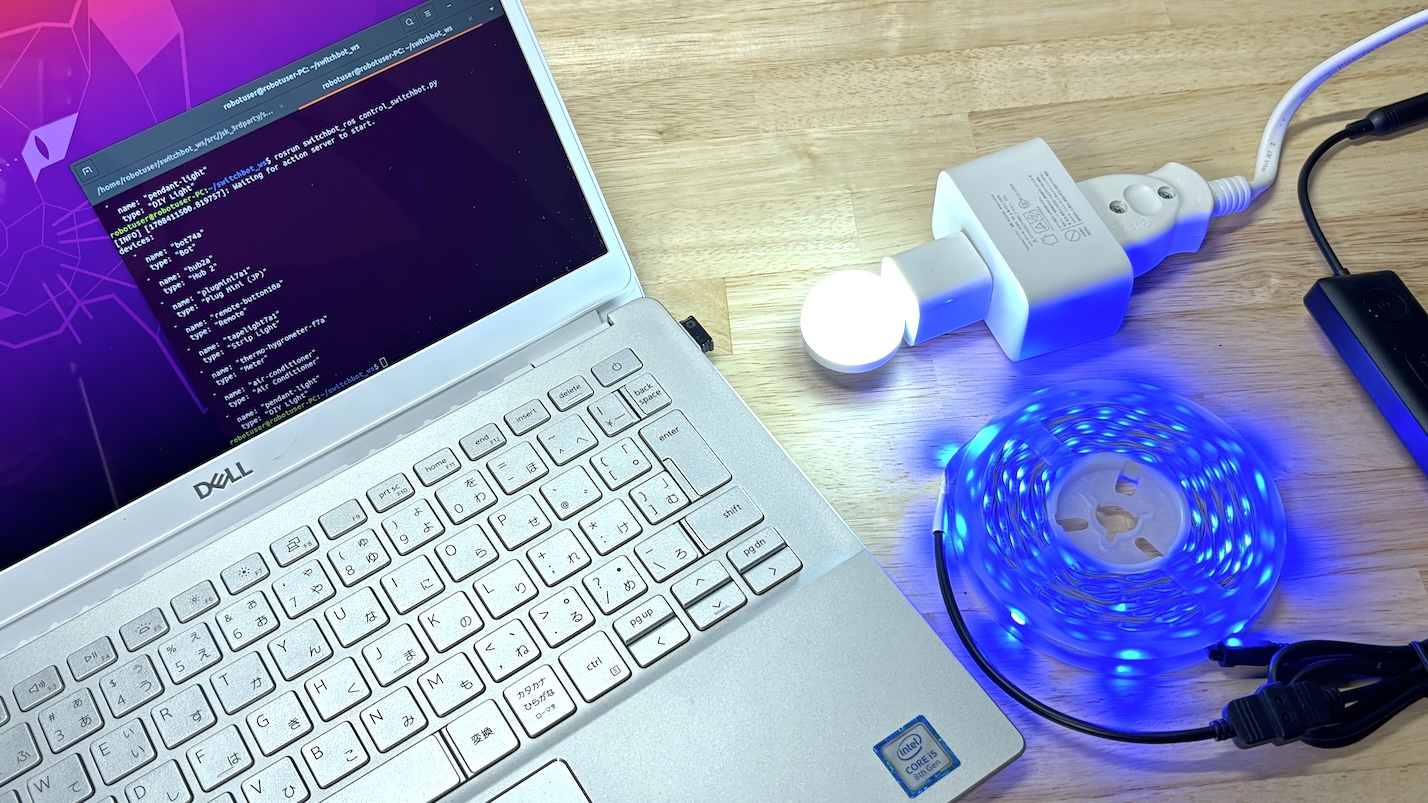
switchbot_ros の中にあるコマンドを発する Python コード例 control_switchbot.py を実行して ROS から SwitchBot デバイスのハブの赤外線リモコン発信で部屋の電気を点灯した後にボット(スイッチ)を動作させます.
control_switchbot.py の中身はシンプルで 12行目 で照明を点灯させて,14行目 でボット(スイッチ)を On しています.
control_switchbot.py
#!/usr/bin/env python

import rospy
from switchbot_ros.switchbot_ros_client import SwitchBotROSClient

rospy.init_node('controler_node')
client = SwitchBotROSClient()

devices = client.get_devices()
print(devices)

client.control_device('pendant-light', 'turnOff')

client.control_device('bot74a', 'turnOn')
client.control_device('pendant-light', 'turnOff') で 'turnOff' となっているのに点灯?と思いますが筆者のペンダントライトのリモコンを SwitchBot アプリで登録する際に電源の On/Off ボタンが1つのものとして扱われていて 'turnOn' も 'turnOff' も On/Off の切り替えボタンとして機能してしまっているためです. ( = もう一度 client.control_device('pendant-light', 'turnOff') を実行すると消灯になる) このように特に登録するリモコンについてはどのようにマッピングができたかに挙動が依存するのでコマンドに対する各々のデバイスの挙動を確認してから利用する必要があります.
操作コマンドの SwitchBot デバイスに至るまでの大まかな流れは次のようになっています.
- control_switchbot.py
- → SwitchBot ROS Client
- → SwitchBot ROS Action Server
- → SwitchBot WebAPI
- → SwitchBot デバイス
それでは実際に実行してみます. SwitchBot ROS アクションサーバを起動してから別ターミナルで control_switchbot.py を実行します.
ターミナル 1 : SwitchBot ROS アクションサーバの起動
下記コマンドの SwichBot ROS アクションサーバの起動実行時に launch オプションの token:=YOUR_TOKEN の YOUR_TOKEN を SwitchBot アプリで取得したトークンに置き換えて, secret:=YOUR_SECRET の YOUR_SECRET を取得したシークレットに置き換えて書いて実行します.
switchbot.launch 実行入力
$ source ~/switchbot_ws/devel/setup.bash
$ roslaunch switchbot_ros switchbot.launch token:=YOUR_TOKEN secret:=YOUR_SECRET
switchbot.launch 実行出力例
... logging to /home/robotuser/.ros/log/87b6e5c8-c1a2-11ee-bce7-1d89a9d14e1f/roslaunch-robotuser-PC-62866.log
Checking log directory for disk usage. This may take a while.
Press Ctrl-C to interrupt
Done checking log file disk usage. Usage is <1GB.

started roslaunch server http://robotuser-PC:40731/

SUMMARY
========

PARAMETERS
 * /rosdistro: noetic
 * /rosversion: 1.16.0
 * /switchbot_ros/secret: (シークレットの上位数桁が表示)...
 * /switchbot_ros/token: (トークンの上位数桁が表示)...

NODES
  /
    switchbot_ros (switchbot_ros/switchbot_ros_server.py)

auto-starting new master
process[master]: started with pid [62874]
ROS_MASTER_URI=http://localhost:11311

setting /run_id to 87b6e5c8-c1a2-11ee-bce7-1d89a9d14e1f
process[rosout-1]: started with pid [62884]
started core service [/rosout]
process[switchbot_ros-2]: started with pid [62891]
[INFO] [1706861436.195243]: Switchbot API Client initialized.
[INFO] [1706861436.199678]: Using SwitchBot API v1.1
[INFO] [1706861436.204957]: Switchbot Device List:
6 Item(s)
deviceName: bot74a, deviceID: (固有のID番号が表示), deviceType: Bot
deviceName: hub2a, deviceID: (固有のID番号が表示), deviceType: Hub 2
deviceName: plugmini7a1, deviceID: (固有のID番号が表示), deviceType: Plug Mini (JP)
deviceName: remote-button10a, deviceID: (固有のID番号が表示), deviceType: Remote
deviceName: tapelight7a1, deviceID: (固有のID番号が表示), deviceType: Strip Light
deviceName: thermo-hygrometer-f7a, deviceID: (固有のID番号が表示), deviceType: Meter

[INFO] [1706861436.208853]: Switchbot Remote List:
2 Item(s)
deviceName: air-conditioner, deviceID: (固有のID番号が表示), remoteType: Air Conditioner
deviceName: pendant-light, deviceID: (固有のID番号が表示), remoteType: DIY Light

[INFO] [1706861436.214168]: Switchbot Scene List:
3 Item(s)
sceneName: turnoff-all-lights, sceneID: (固有のID番号が表示)
sceneName: turnon-all-lights, sceneID: (固有のID番号が表示)
sceneName: turnon-all-lights, sceneID: (固有のID番号が表示)

[INFO] [1706861436.254126]: Ready.
ターミナル 2 : control_switchbot.py の実行
ターミナル1 の switchbot.launch を起動したままの状態で別のターミナルで control_switchbot.py を実行します.
control_switchbot.py 実行入力
$ source ~/switchbot_ws/devel/setup.bash
$ rosrun switchbot_ros control_switchbot.py
control_switchbot.py 実行出力例
devices:
  -
    name: "bot74a"
    type: "Bot"
  -
    name: "hub2a"
    type: "None"
  -
    name: "plugmini7a1"
    type: "Plug Mini (JP)"
  -
    name: "remote-button10a"
    type: "Remote"
  -
    name: "tapelight7a1"
    type: "Strip Light"
  -
    name: "thermo-hygrometer-f7a"
    type: "Meter"
  -
    name: "air-conditioner"
    type: "Air Conditioner"
  -
    name: "pendant-light"
    type: "DIY Light"
control_switchbot.py 実行出力時の SwitchBot デバイス動作の様子
SwitchBot を ROS から操作する感じが伝わりましたでしょうか?
今回の記事はここまでです.
本シリーズ次回の記事では今回実行した Python コード例で扱われていたもの以外の SwitchBot デバイスを ROS から操作するために SwitchBot API を調べて control_switchbot.py にコマンドを追加する様子についてお伝えする予定です.